Aside from quality, the most important thing to working in VFX is speed. Deadlines and turnarounds can be so ridiculously fast, so learning to be efficient is a must if you want to excel in the industry. There are a few ways to cut corners without sacrificing quality which I will talk about in the blog post.
Kitbashing
Kitbashing is taking premade parts and using them to speed up the modelling process. You can't use them on areas that need to match on set but they are invaluable for quickly detailing out less obvious areas. A lot of studios will have premade model parts like pipes etc to use on assets to speed up the time, there is no need to make pipes over and over if you already have some nice UV'd ones. Reuse anything you can, even if it involves taking another part and modifying. Building a bunch of spaceships for a show, there is bound to be plenty of details and small components you can copy between them even if the shapes of the ships are quite different. Kitbashing is more of a dressing thing to add that extra level of detail fast. Also dont look at each piece as a whole but the smaller components. There are plenty of times I have brought in a whole engine to take a small component that I wanted and deleted the rest.
Fortunately for me if I was to model this it was made with my own kitbash parts but if it wasn't, you could still take similar looking pieces and use as a start and modify for the inner details. All of the main features will have to be custom modeled though. If all you have is the concept of a jet exhaust but it is not refined or specific, you could just use a premade one and modify it if needed. Cutting the need to model this one piece could save a lot of time on modelling and UVing for something that might not be that important on the asset in the first place, like if you never really see it in shot.

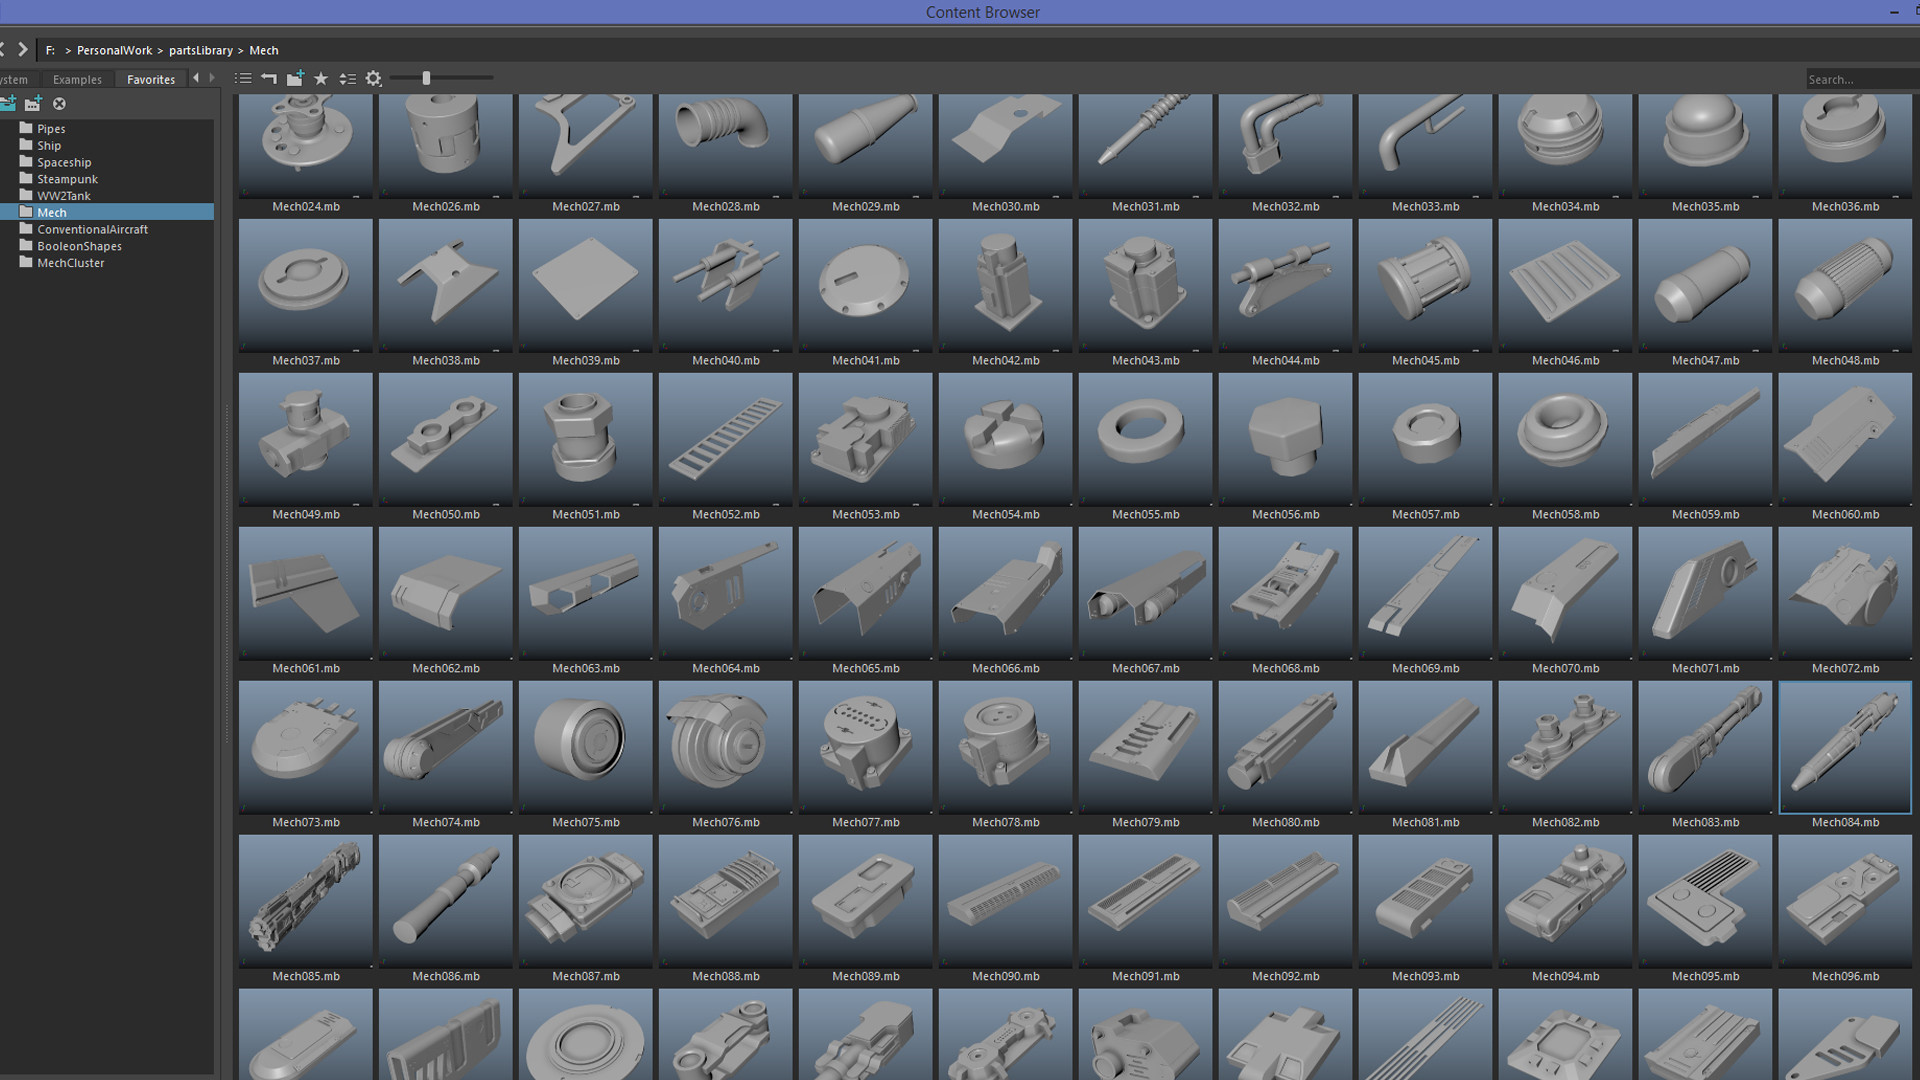
Below is part of my own personal kitbash library with some parts that I already sell, this can be found on my Gumroad (https://gumroad.com/andrewhodgson). Whenever I finish a personal project I look over the whole model and separate anything that looks cool or could be used again and I save each piece as its own Maya file. What you see below is the content browser that can be found under Windows > General Editors > content browser. With the content browser I can just drag and drop the piece I want in to my scene. This is bringing a Maya scene into your current scene so be aware of what is in each individual piece file as you may be bringing in a lot of random unused shaders etc. You get the option to make the thumbnails whenever you save the file in the options with maya 2017 and later.
Thinking Modular
Thinking modular is mostly referring to environment work, it is pretty fundamental to make environments in a modular fashion, especially with lots of repeating features. The idea is that you check in small individual components separately as their own assets that can be referenced in later by an environment artist to make the large environment.
What is great about this is you only have to make and maintain a limited amount of assets that can be used to make much larger things. If there are creative notes to say a type of crate, you can address them all in the scene as a whole by adjusting the source. It is best to name your assets alphabetically like crateA so if they need a new slightly different version while keeping the original you can make a crateB and so on.
Below is a very basic example to just illustrate the idea that is used to make most large environments. A more large scale example you can see is in the Breakdown from Industrial Light & Magic of the Megadestroyer Hanger for Star Wars Episode 8. I made most modular components in the environment working closely with the environment team, You can literally see the individual pieces fall down. We also made use of LODs for the components which I will talk about below.
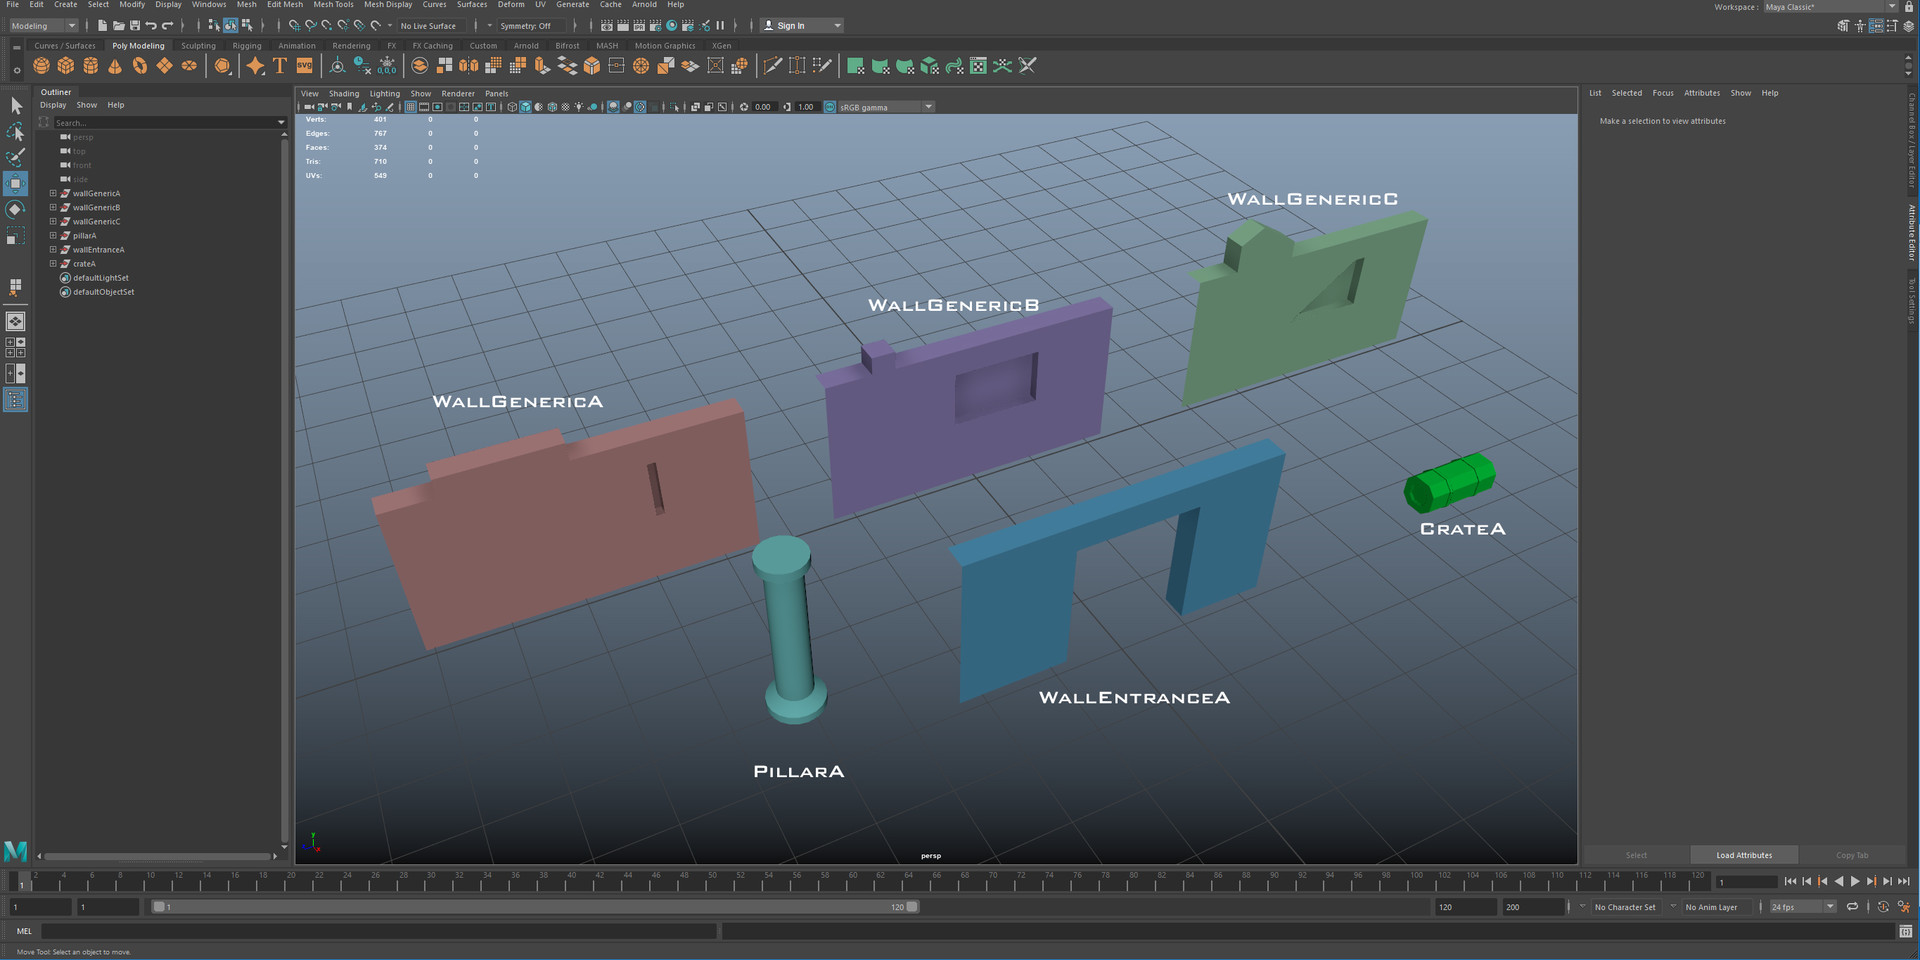

The thing to consider with working modular this way with other artists is that it can be very destructive if you aren't careful. It is useful for these objects to be checked in at the origin on ground level if they need to as this is where the locator will be when referenced. It is extremely important to not move a modular asset and check it back in over its original once it is in use in the pipeline as it will move every single referenced version of it in other artists scenes. The model itself can be updated but it can't be moved (unless requested some reason by a sup) and you need to let the right people know you have updated the asset.
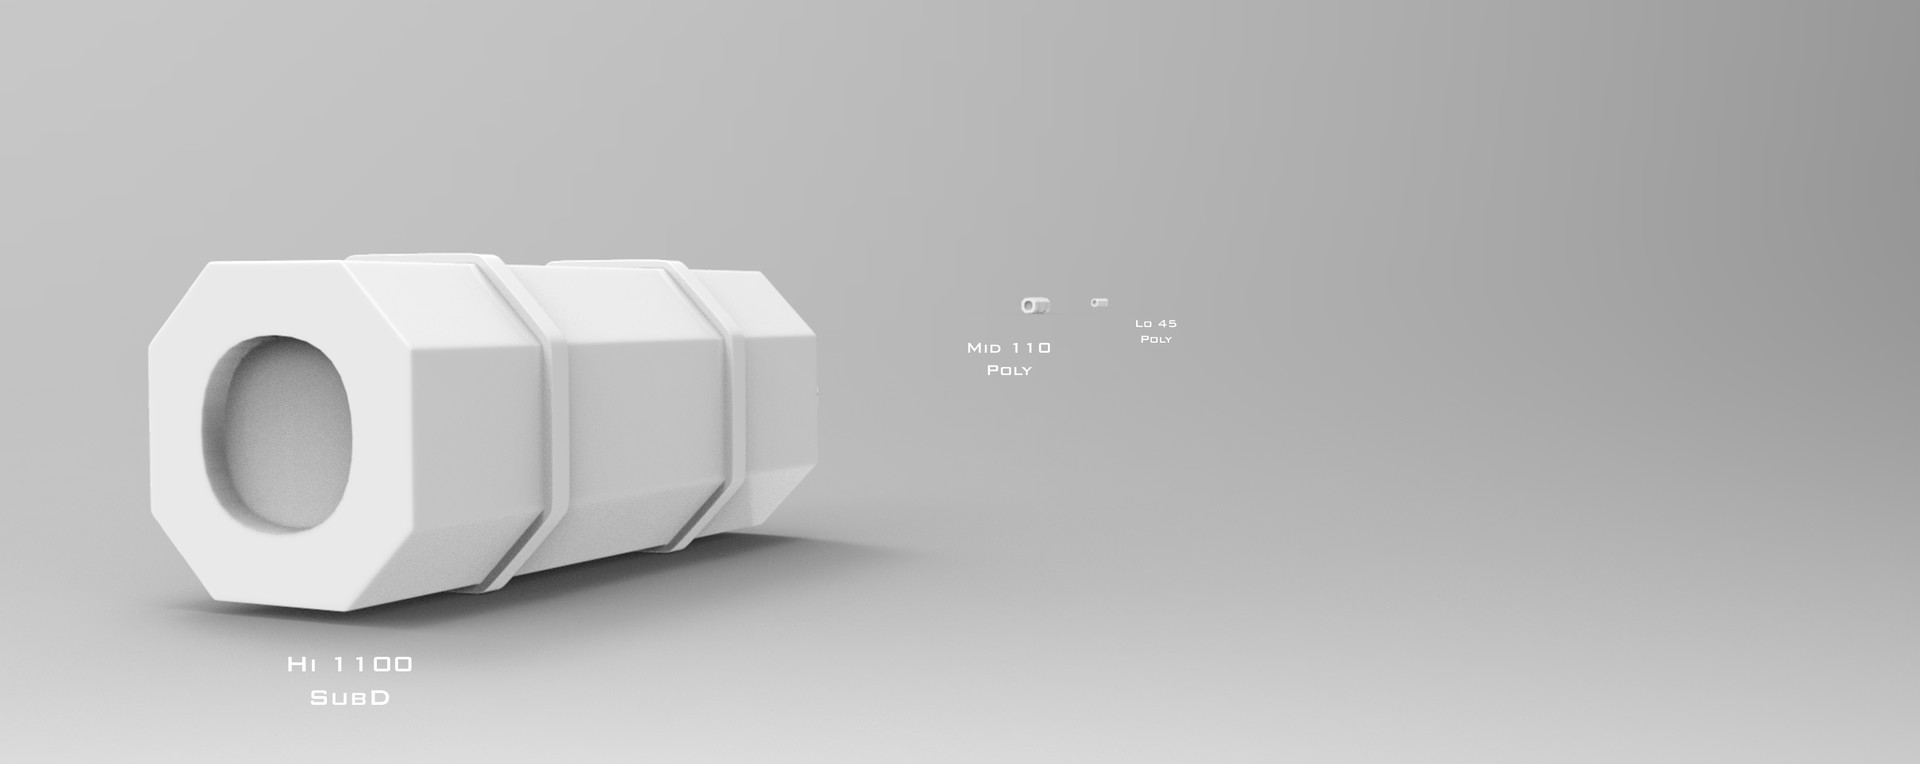
Creating LODs from Hero Mesh
LOD stands for Level Of Detail. This term is used when talking about how much complexity should be added to the model based on how close you see it. Depending what studio you are at, they can be referred to as Hi, Mid, Lo, Xlo or A, B, C, D etc with Hi or A being a very hero asset.
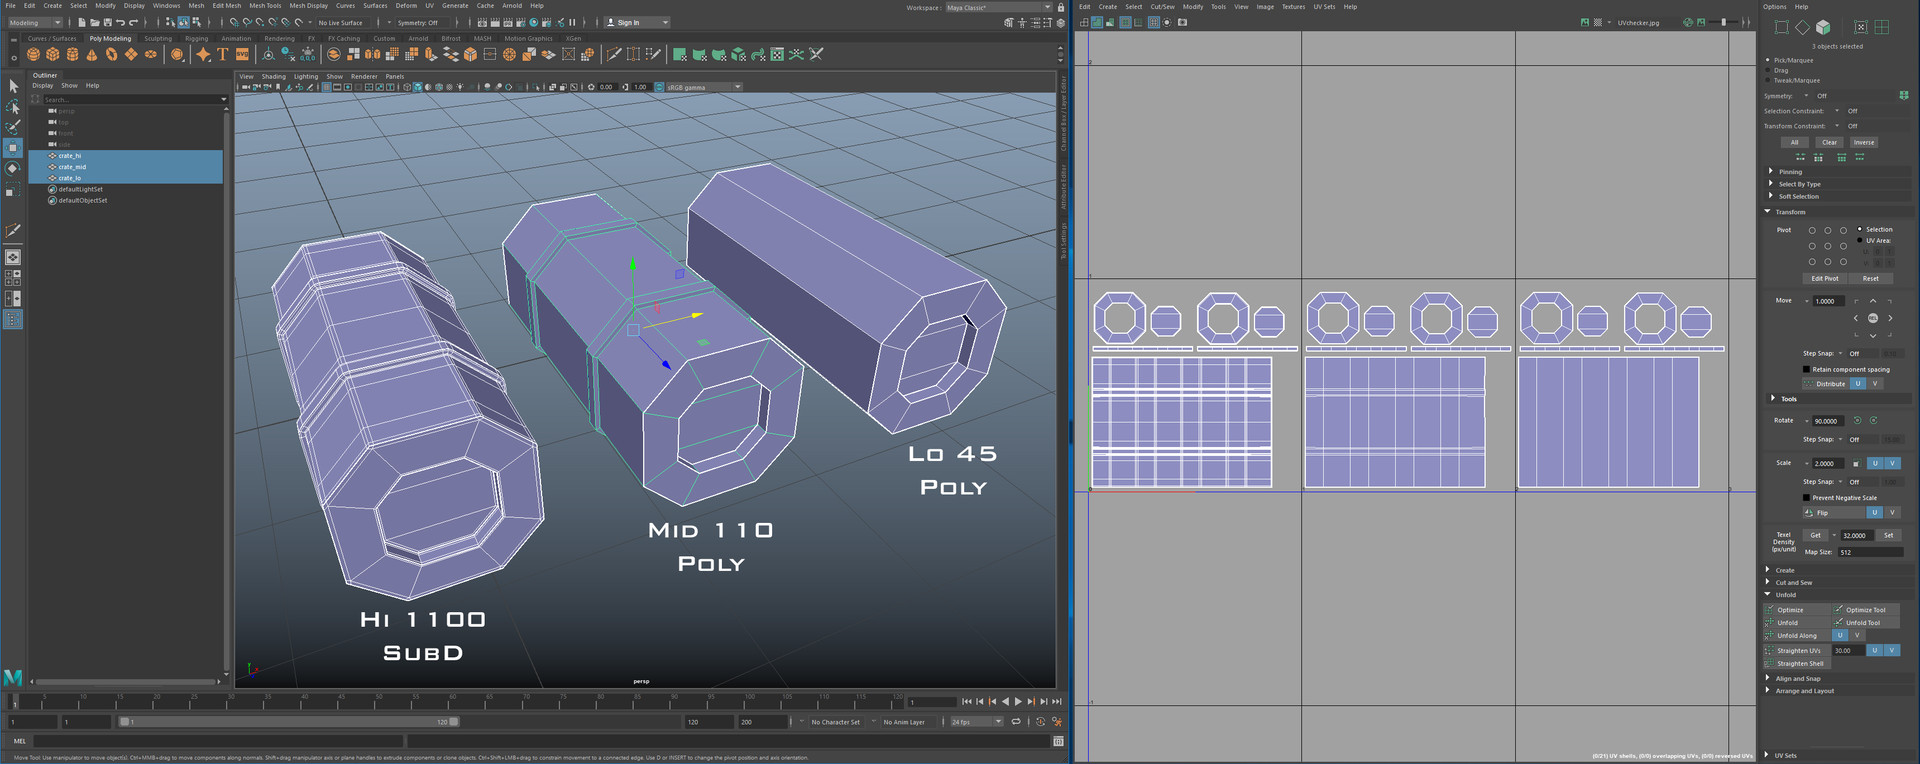
Some studios have an automated process that will create the different LOD for you when you check your model in to the pipeline but it isn't perfect and sometimes you need to make your own LODs. The reason we have LODs is say for example you have a hero crate right in front of the camera and then that same crate in the distance, you wont need your full screen model for them so we make a small alternate version to hold up at that distance, helping with render time. You can see in my example below that the unsubdivided Hi crate is 1100 polys where the lo version is only 45. Fill an entire environment with these and the poly count will go up fast. Speed isn't just important in working but also in render time. Lighters will love you if you can help their render times but the work still looks good.
The idea is you take your hero and most important, already UVd model and reduce the poly count with various methods. This is where modelling with efficient topology can come in handy because it is a lot easier to down res your model. Depending on how large the model is you can just manually remove edgeloops or you can use Maya Reduce. It is very important to keep the UV editor open though while doing this because you don't want to break the UV. The whole point of this is that the hero object can just be textured once and the LOD use the same textures. This is why it must be UV'd first. This also means you need to UV it smart so that seams aren't in the middle of faces etc. In my example below I made the original ridges as part of the main body UV, so for the far away version I could remove them completely without breaking UVs. You cannot remove an edgeloop that has a UV seam on it.
Hopefully people learn a thing or two from this. These are just my thoughts and my standard practice at work. Any questions just ask below and please spread the word if these sorts of things helped you.