10 Basic UV Examples
UV Example 01 - Setting up the Grid
How to go from Base Maya layout to production Layout. Can go Max UDIMs up but only 10 to the right. The base UDIM the cube starts in is 1001 and goes up to 1010 to the right, No UV to the left or below 1001.
UV Example 02 - Setting up the Checker Texture
How to set up basic UV checker, google search for one to use. The repeat section determines the resolution of the texture. 4x is 4k texture, 8x is 8k texture. Textured view must be active in the viewport.
UV Example 03 - Basic UV Fundamentals
Basic UV fundamentals on a cube with everything on the sides pointing up and unified scale among all pieces. An exception of this could be if you never see the bottom of the cube you can scale that piece down.
UV Example 04 - UV With Various Forms
Basics of UVing more complex shape than a cube, breaking the pieces down to their individual forms. Consistent direction among the pieces.
UV Example 05 - Unitize Pipe Method
Most useful trick I ever learned for UV from my lead at MPC Ash Tilley. Puts all faces unified, move and sow them together to get a grid then unfold in one direction.
UV Example 06 - Unitize Cylinder Method
Same Unitize method for cylinder, slice it up if the scale starts coming too out of sync Keeping everything straight helps with texturing A LOT.
UV Example 07 - Curved Panel with Unitize
How Unitize can be used in another way to keep the sides of panels clean and efficient.
UV Example 08 - Transferring Attributes
A good practice to get in to is to UV something before you duplicate it. If you find yourself in this position however this is how you can transfer the UV between duplicates of the same shape.
UV Example 09 - Consistency and Logical Layout
Keep UV consistent between different objects, directions of faces are the same. Layout the UV so its easy to work out what piece is what just by looking at the UDIM alone in comparison to the rest.
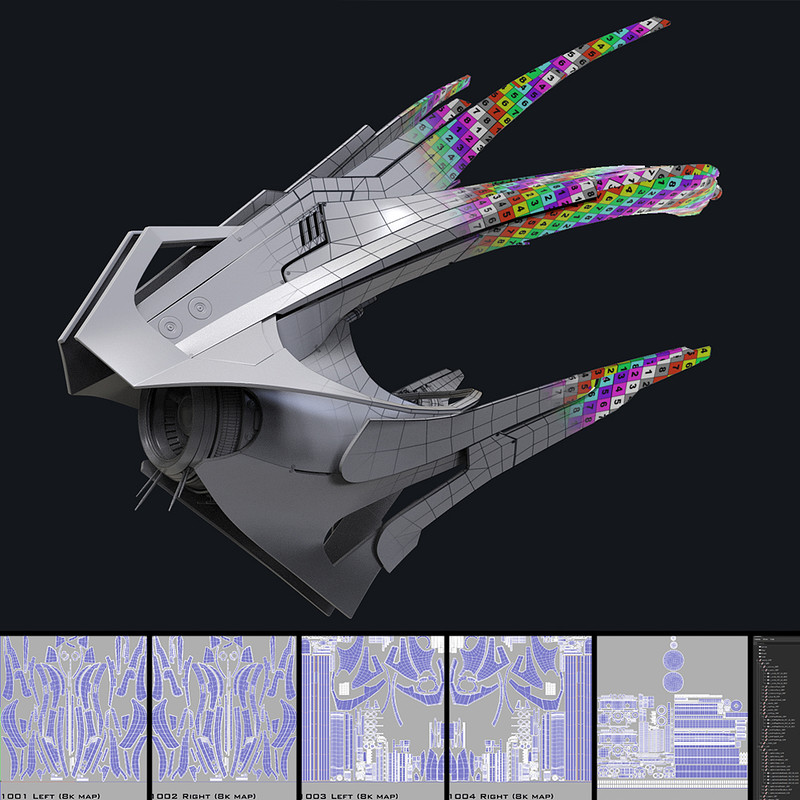
UV Example 10 - Full Asset Layout
Organize your asset in Left, Right and Center UDIM to keep it easy to update. Keep each UDIM mostly with the same material and even separate the materials by the rows.
It was requested quite a lot, so I put together 10 base UV examples I use, starting from how to set up the Grid to A full assets Layout.
Everything I do is in base Maya 2018 so there is no plugins although I am sure there are quite handy plugins out there. There Is also many ways to do things and many programs to do UVs in, this is just generally how I tackle shapes. The videos are quite basic and to the point but even UVing the most complex shapes stems down to breaking the shape up in to its most basic forms and tackling them individually.
Use Shift Right Click and Ctrl Right Click to access the sub menus I use, they change based on UV, edge or Face selection.
In example 10 I am sure people will comment on the wasted space, but in film UDIM count is rarely an issue for us while updating a model after its even textured is common. so flexibility, organization and texturing ease over a few more pixels of resolution.
Any questions comment below.